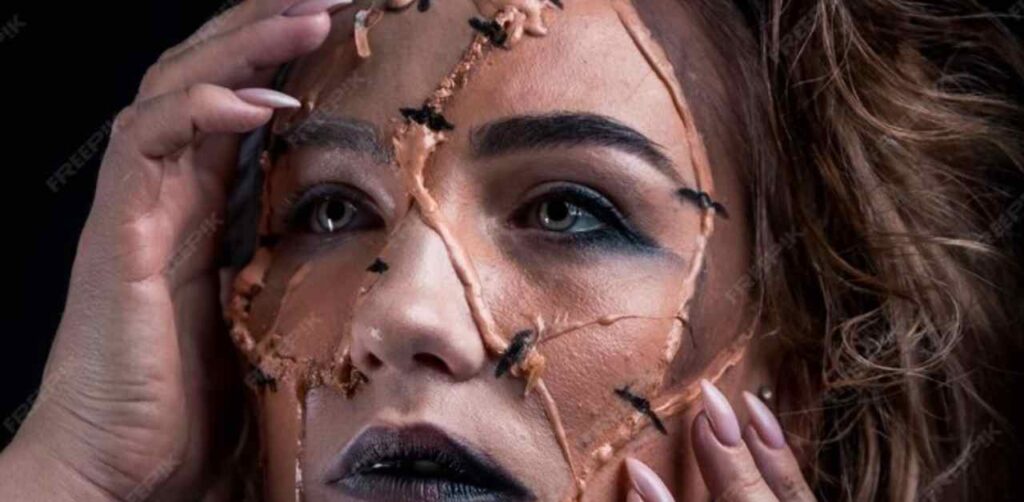
Are you fascinated by movie monsters, fantasy creatures, or realistic wounds that look straight out of a horror film? If so, you’re not alone! SFX makeup prosthetics allow you to create these jaw-dropping looks, bringing your imagination to life. Whether you’re crafting scars, horns, or aged skin effects, making your own special effects prosthetics is both exciting and rewarding.
In this step-by-step DIY guide, we’ll walk you through how to make SFX makeup prosthetics — from sculpting your design to blending the finished piece seamlessly onto your skin. No need for expensive kits or professional experience — with the right tools and a bit of creativity, you can master the art of special effects makeup right at home. Let’s dive into the magical world of SFX prosthetics and unlock your inner artist!
Why Make Your Own SFX Prosthetics?

Making your own SFX prosthetics gives you full control over your design, fit, and creativity. Store-bought prosthetics often don’t match your exact vision — they can be the wrong size, have limited designs, or just look too generic.
When you create your own, you can sculpt every detail to fit your face or body perfectly, whether you want realistic scars, fantasy horns, or alien features. Plus, it’s usually more affordable than buying high-end pieces, and the process itself is a fun, hands-on way to bring your ideas to life. It’s not just about saving money — it’s about crafting something unique that stands out, whether for a cosplay event, Halloween, or a creative photoshoot.
Essential Supplies and Tools – How to Make SFX Makeup Prosthetics
Step 1: Sculpting Your Prosthetic Design
The first step in making your SFX prosthetic is sculpting your design. This means shaping your idea using soft modeling clay. Whether you want a deep scar, elf ears, or monster horns, this is where you bring it to life. You don’t need to be an expert — just take your time and have fun experimenting. Use simple tools like a spoon, toothpick, or even your fingers to create details and textures. The goal is to make your design as realistic as possible because this clay model will be used to make the mold for your prosthetic.
Tips for Sculpting Your Prosthetic:
- Use soft modeling clay – Make sure it’s non-drying (not oven-bake or air-dry).
- Keep edges thin – Taper the edges so the prosthetic blends smoothly onto your skin.
- Add texture – Use a spoon, fabric, or a toothpick to create scars, wrinkles, or rough skin.
- Check references – Look at real scars, animal features, or fantasy designs for inspiration.
- Don’t stress about perfection – Natural-looking scars and wounds often have imperfections.
Once you’re happy with your design, step back and check it from different angles. Small details can make a big difference. This step is all about creativity, so take your time and enjoy the process!
Step 2: Creating the Mold with Plaster of Paris
Now that your sculpt is ready, the next step is to create a mold — basically, a solid, detailed impression of your design. This mold will act like a “master copy” that you’ll use to cast your final prosthetic. We use Plaster of Paris because it’s affordable, easy to mix, and sets quickly, making it perfect for SFX work. Don’t worry if this sounds complicated — once you get the hang of it, it’s pretty straightforward.
Here’s how to do it:
- Set up your workspace — Cover your table with newspaper or plastic to keep things clean.
- Mix the plaster — Follow the instructions on the packet. It should be smooth, like pancake batter — not too thick, not too runny.
- Pour carefully — Slowly pour the plaster over your sculpt, making sure you cover every detail.
- Pop the bubbles — Gently tap the mold or give it a soft shake to get rid of air bubbles. This helps capture all the fine lines of your design.
- Let it set — Be patient! It usually takes about 30–60 minutes to harden.
- Remove the clay — Once the plaster is rock solid, gently peel or scoop the clay out, leaving a nice, detailed mold behind.
Once your mold is dry and solid, give it a quick check for any cracks or bubbles. Small flaws can be patched up with extra plaster. This mold is now ready for the next exciting step — bringing your prosthetic to life!
Step 3: Casting Your Prosthetic Using Liquid Latex
Here’s where the magic happens — creating the actual prosthetic piece that you’ll apply to your skin. To do this, we use liquid latex, a flexible material that mimics skin texture and blends well for realistic effects. It’s a staple in SFX makeup because it’s easy to work with and moves naturally with your face or body.
Here’s how to cast your prosthetic:
- Brush on the first layer — Use a soft brush to spread a thin coat of liquid latex inside the mold.
- Build it up slowly — Don’t rush! Let each layer dry a bit before adding the next one. Aim for about 5–7 layers until it’s thick enough.
- Thin the edges — Pay special attention to the edges — you want them as thin as possible so the prosthetic blends into your skin easily.
- Speed up the drying — If you’re in a hurry, use a hairdryer on a low, cool setting to help the latex dry faster.
Once the latex is dry, it should feel firm yet flexible — strong enough to hold its shape but soft enough to move with you. It’s almost ready for the big reveal!
Step 4: Removing and Finishing Your Prosthetic
Now comes the most satisfying part — removing your prosthetic from the mold and adding the final details to make it look as realistic (or as monstrous!) as you want.
Here’s how to finish it off:
- Peel it out gently — Start at the edges and work your way in. Take your time so you don’t tear it.
- Trim the edges — Grab some small scissors and carefully cut off any extra latex so the edges look clean.
- Add some life to it — Use SFX paints to give it color — maybe veins, bruises, or scars, depending on the effect you want.
- Check the fit — Place the prosthetic on your skin and make sure it sits right. Adjust the edges if needed.
- Powder the back — Dust some baby powder or cornstarch on the back of the prosthetic. This keeps the latex from sticking to itself.
And there you have it! Your custom SFX prosthetic is ready to go. You can attach it using skin-safe adhesive, blend the edges with makeup, and add more details until it looks perfect. It might take a few tries to get it just right, but that’s all part of the fun — each piece you create will get better and more realistic!
How to Apply SFX Prosthetics to Your Skin
Once your prosthetic is ready, it’s time to bring your creation to life by applying it to your skin. This step is just as important as making the prosthetic itself — a bad application can ruin even the most realistic design. But don’t worry! With a bit of patience and the right technique, you’ll get a seamless, natural look.
Follow these steps to apply your SFX prosthetic:
- Prep your skin — Start by cleaning your skin with a gentle cleanser. Any oil or makeup can stop the adhesive from sticking properly. If you’re extra cautious, apply a thin layer of toner or rubbing alcohol to make sure your skin is oil-free.
- Test the fit — Hold the prosthetic against your skin to check the placement. Make small adjustments if needed, like trimming the edges so it blends better.
- Apply the adhesive — Use a skin-safe adhesive like Pros-Aide or spirit gum. Brush a thin layer onto the back of the prosthetic and also on the skin where you want it to stick. Let the glue get tacky for a few seconds — this helps it bond better.
- Stick it on — Gently press the prosthetic onto your skin, starting from the center and smoothing outward. Press down firmly but carefully, especially around the edges.
- Blend the edges — To make the prosthetic look like part of your skin, use liquid latex or a silicone blender. Dab it around the edges and let it dry.
- Powder to set — Dust a bit of translucent powder over the adhesive areas to remove any stickiness. This also helps the makeup go on smoothly later.
- Paint and detail — Finally, use SFX makeup or alcohol-activated paints to color-match the prosthetic to your skin tone. Add extra details like veins, wounds, or scars for a more dramatic effect.
Once everything is set and blended, your prosthetic should look realistic and stay put for hours. Whether you’re creating a gory zombie look or a fantastical creature, nailing the application process will make your design truly stand out.
Tips for Blending and Painting Your Prosthetic
| Step | What to Do | Pro Tip |
| Prep the Surface | Clean the prosthetic and your skin to remove oils. Apply a thin layer of primer if needed. | This helps the paint stick evenly. |
| Blend the Edges | Use liquid latex or silicone blender to smooth the edges into your skin. Let it dry completely. | Feather the edges outward for a seamless look. |
| Set with Powder | Dust translucent powder over the prosthetic to remove any tackiness from adhesives. | Prevents paint from clumping. |
| Base Paint Layer | Apply a base color that matches your skin tone using a sponge or airbrush. | Use light layers — build up color slowly. |
| Add Details | Use fine brushes to add details like veins, scars, or bruises. | Work in layers to create depth. |
| Highlight & Shadow | Add highlights to raised areas and shadows in creases for realism. | Blending is key — use a soft brush! |
| Set the Paint | Finish with a setting spray or powder to lock everything in place. | Essential for long-lasting wear. |
Common Mistakes and How to Avoid Them
When working with SFX prosthetics, mistakes can happen — and that’s okay! But knowing the most common slip-ups can save you time, effort, and frustration. Let’s break down a few of these mistakes and how to avoid them.
- Skipping Skin Prep:
Not cleaning and drying your skin properly before applying prosthetics can cause the adhesive to fail, making your creation peel off too soon. Always start with clean, dry skin to help everything stick securely. - Thick Edges:
If the edges of your prosthetic are too thick, they’ll stand out and look unrealistic. To fix this, gently thin the edges using liquid latex or silicone blender, making them blend seamlessly into your skin. - Overloading Paint:
It’s tempting to slap on thick layers of paint, but this can cause cracking and an unnatural look. Instead, use thin layers of paint and build up the color gradually — this creates a more realistic effect. - Ignoring Drying Times:
Rushing through drying times — whether it’s adhesive, latex, or paint — can ruin your work by causing smudging or slipping. Always give each layer the time it needs to dry fully before moving to the next step. - Using the Wrong Adhesive:
Not all adhesives work the same way. Using regular glue or the wrong type of adhesive can irritate your skin or cause the prosthetic to fall off. Stick to skin-safe adhesives specifically made for SFX makeup.
By keeping these common mistakes in mind, you’ll save yourself a lot of hassle and get a more professional finish. SFX makeup is all about patience, practice, and precision — so take your time and enjoy the creative process!
FAQs About DIY SFX Makeup Prosthetics
What materials do I need to make SFX prosthetics at home?
You’ll need sculpting clay, Plaster of Paris for molding, liquid latex or silicone for casting, and skin-safe adhesives for application. Don’t forget paints and brushes for finishing touches!
Is liquid latex safe for my skin?
Yes, liquid latex is generally safe, but always do a patch test first. If you have a latex allergy, opt for silicone-based alternatives.
How long does it take to make a prosthetic from start to finish?
It depends on the design’s complexity. Simple prosthetics can take a few hours, while more detailed pieces might take a day, especially considering drying times.
Can I reuse my prosthetics?
Yes! If you’re careful when removing them and store them properly, most prosthetics can be reused multiple times. Clean them gently and keep them in a cool, dry place.
What’s the best way to blend prosthetics into my skin?
Use liquid latex or silicone blender to smooth the edges. After that, apply foundation or paint that matches your skin tone to make the prosthetic look as natural as possible.
How do I remove prosthetics without hurting my skin?
Use a prosthetic remover or an oil-based cleanser. Gently peel from the edges and avoid pulling too hard — take your time to protect your skin.